Creating an Interactive Video using a Raspberry Pi
This past year I have been chosen as one of the first 9 Raspberry Pi Creative Technologists in the UK; each of whom have come from different creative backgrounds, such as animation, photography and even magic! Throughout this programme we were shown various uses of the Raspberry Pi, a miniature and affordable computer, as well as the basics of how programme in Python, create functioning circuit boards and use hardware form the Raspberry Pi’s GPIO pins. We learned this all with the ultimate aim of using this new technical knowledge to enhance our creative skills that we already had; helping us evolve from ‘Creatives’ to ‘Creative Technologists’! We then showed this newfound knowledge off with a project of our very own to exhibit at a Raspberry Pi Creative Technologist exhibition held and ran by ourselves!
The exhibition went extremely well, being held in Cambridge at Raspberry Pi Headquarters, and I couldn’t help but be so inspired by all of the creative projects surrounding me; from a projection mapped pop-up book to a html game that lit up a sculpture the more it was played. Every project was completely unique and equally amazing!

So what was my exhibition piece? AN INTERACTIVE VIDEO!
Before I go into details, watch this video to get a good flavour of the project and also see some fun clips from the exhibition
The Hardware
I used:
- Raspberry Pi 2
- Motion Sensor
- Buttons
- Bread Board
- PiCamera
- HDMI Cable (Connected to a monitor or, in my case, projector to play the video)
- Speakers for local audio output, attached to the Pi
Before starting this programme I knew nothing about circuit boards or physical hardware engineering, but for this interactive video I knew that I needed some physical interaction to change the state of the video so I needed to use some hardware. I needed two buttons and a motion sensor to be hooked up to the Pi at the same time using the GPIO pins on the Pi itself.

The motion sensor could be connected straight onto the Pi using a 5v pin, ground pin and whichever number I wanted (and would have to refer to this number in my Python script). The wires should be connected correctly according to what is stated on the underside of the sensor board and to the correct pins, you can check this by seeing a Raspberry Pi 2 GPIO pin chart online. Luckily there is a lot of documentation of there of how to set this up such as this blog post on the Raspberry Pi blog itself.
The buttons however needed to be attached to a bread board, which worked well for me as I could then decorate this bread board afterwards and stick it onto the outside of my decorated dolls house. For each button I needed one cable to be connected to a ground pin and another to be connected to a numbered pin of my choosing (like the motion sensor, I would refer to this pin number in my Python script). Again, there’s much documentation out there about how to easily set this up, such as this blog post on the Raspberry Pi website.
To double check you have everything wired up okay you can simply open up the Python editor on the Raspberry Pi and, looking through the GPIOZero documentation, use some simple test codes to check whether the inputs are working as the be expected. It’s worth noting here that the motion sensor does have two potentiometers (little orange screws) that allow you to adjust the sensitivity of the sensor and the detection time.
As well as this I attached the PiCamera straight onto the Pi by inserting it into the camera port, stated on the Pi board, with the blue strip facing towards the USB ports. To ensure the camera was enabled by the pi I opened up the terminal and typed sudo raspi-config to show the configuration settings and made sure that the PiCamera was enabled.
It’s worth noting that when running videos off the Raspberry Pi it’s wise to split the GPU! I split mine to 128 but it may need to be higher for larger video sizes.
This may all sound like a mess of wires and cables but here’s what the project looked like in the end:

Hidden within that dolls house is: the Raspberry Pi, speakers, motion sensor and the PiCamera, hidden behind a physical cut-out of ‘Terror’. The HDMI cable connecting to the projector, through which the video will be playing, comes out of a hole at the side of the house. As you can see, I’ve been able to disguise the bread board well by turning it into a sign for the audience to know which button does what when interacting with the video.
The Code: Python
Packages and libraries used:
You can view my code over on my Github but I’m going to break it down a bit for you…
To ensure that I had what I needed installed on the Raspberry Pi, ready to use it in my code, I ran ‘sudo apt-get update’ and ‘sudo apt-get upgrade’ from the terminal (the sudo is needed to that the computer knows you’re a super user… Yes, kinda like a superhero!… But not really)
You should then be able to run ‘sudo pip install [package]’ from inside the terminal and be able to install the libraries and packages needed to put to good use!

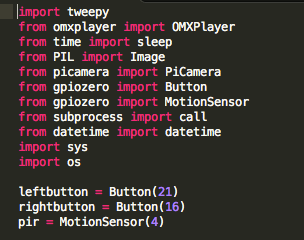
Setting up the imports and variables is the most important part when coding, so we know what to refer to! To the left is all of my imports, ones that I have mentioned above plus a couple of extras. Includes such as ‘time import sleep’ are very handy as it allows you to sleep your programme while it runs, giving you more control over debugging and the timing in which different parts of the script run at. I’ve also included ‘from subprocess import call’ and ‘import os’ because I was finding that the omxplayer could be a little buggy with playing back audio files and would play them within the terminal but not the Python script, using this I could call a process through the terminal from my Python script.
As explained earlier I have set the variable names for each of my hardware components so that they are easily identifiable as I worked my way through the code. I have stated which GPIO pin each component is connected to so that the script can access them.

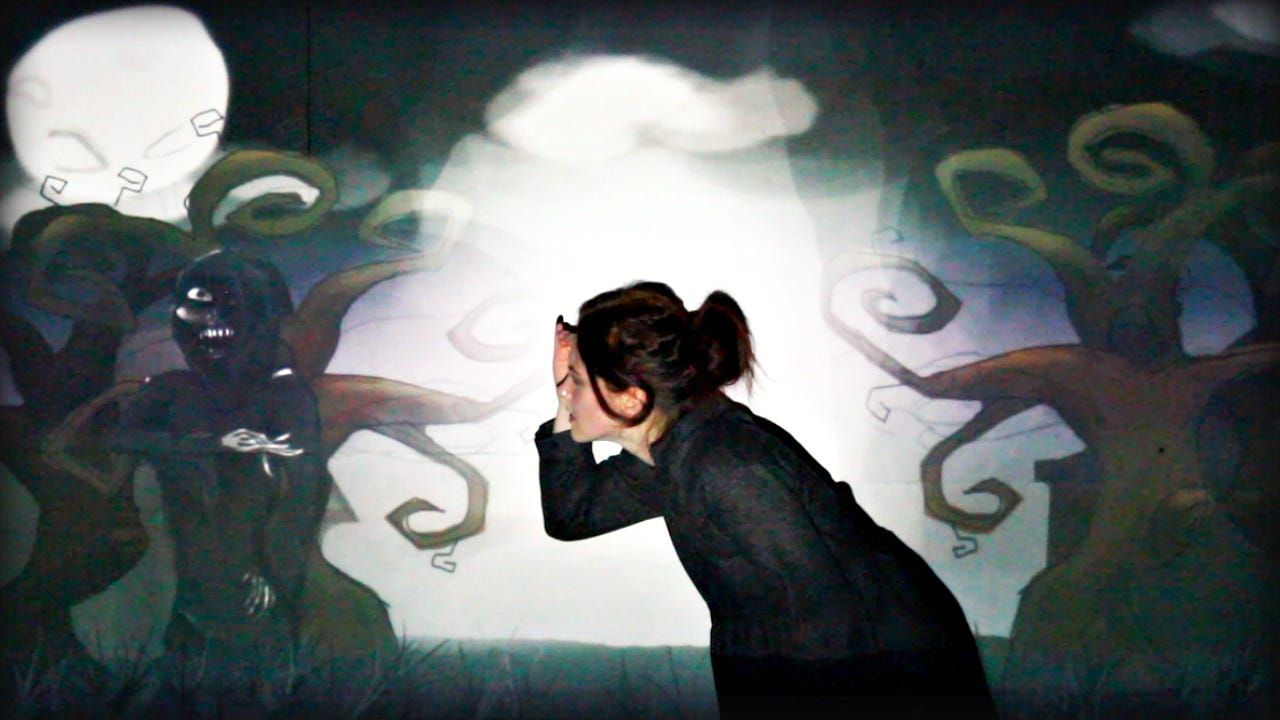
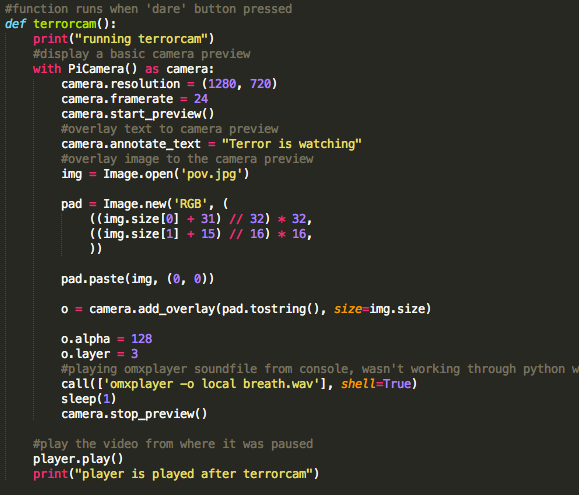
After this I added simple functions such as the terrorcam() function which was called whenever the audience pressed the rightbutton and would use OMXPlayer to pause the video, then display a camera preview from the PiCamera with an overlay image of Terror’s haunting eyes staring out of the cracks of the dolls house (don’t forget the camera is within the dolls house, hidden behind a cut-out of Terror). As well as this it uses the terminal to play a sound clip of some unnerving breathing, sleeps for a second and then stops the camera previw and uses OMXPlayer to play the video again. To create the image of Terrors eyes to overlay over the camera preview I simply zoomed into my existing image of Terror and made sure that the image size was of the same output size of the camera preview; 1280 x 720.
Top Tip: If you’re struggling to debug, add print comments to every action the script has to take. That way you can see where the script reaches before it breaks and what needs your attention!
Tweeting an image to twitter with customised overlay
The internet is a wonderful place, full of open-source code and well documented tutorials! Much like RaspiTV’s well documented tutorial on how to tweet an image with overlay text and a logo, this I was very happy about as I really wanted the image of the person who peeked into the house to not only tweet them, but show them within the ‘Terror World’ that they had just seen within the video. So it’s as if I had brought them into the narrative itself!

After creating my own @WhoIsTerror twitter page and setting up an app through http://apps.twitter.com I was then able to retrieve my own Twitter consumer keys and access tokens to use the code presented within the RaspiTV blog post and looked in to ImageMagick to understand more about the positioning of an image on top of the picture that it taken by the PiCamera. By reading this documentation I saw that by changing RaspiTV’s code to ‘-gravity center -composite’ I could simply have my image overlaid directly in the centre of the image that had been taken by the PiCamera. All I then needed to make sure of was that my image was the same size as the output of the picture taken by the PiCamera so that it would match up perfectly.
The end result turned out looking great! A picture was taken and my scene, a .png image of the street of ‘Terror’ was placed over their faces, putting them right in the centre of the action!
Looping the script
Surprisingly, (or unsurprisingly to some who know better), the most difficult part of the coding process was the part that I had assumed would be the easiest; getting the script to loop throughout the day so I didn’t have to keep running it each time a new person came to experience the interactive video.

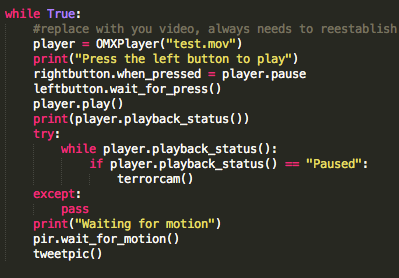
There seemed to be a bug with the OMXPlayer being ran through Python that when the video finished playing it would kill the OMXPlayer entirely, disregarding the variable that I had originally set at the top of the script for my video file.
So what the genius Ben Nuttall did was put the variable within the while loop, and changed the experience slightly so that the pi waited for motion and when triggered the tweetpic() function has to be called before looping again. This way the video file will always be assigned and ready to play!
Conclusion: Having a physical object made the whole narrative a lot more immersive and fun for the audience involved!
If you would like to see how I created the illustrations and how I used projection to bring those illustrations to life around me then check out this video:
Feel free to contact me on yasmincurren@gmail.com or tweet me if you would like to chat about interactive videos, immersive experiences or anything of that ilk! All ideas, questions or proposals welcome!

Originally published at www.yasminc.co.uk on May 4, 2016.
